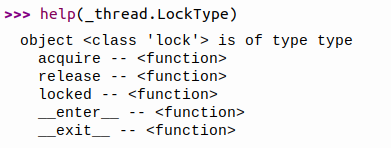
This article is about using the _thread class with an ESP32 microcontroller with 2 cores. However, the thread class is a subset of the cython module and at the time of writing it is not yet fully available. The class structure is as shown in Figure 1 and the LockType subclass is as shown in Figure 2.


_thread
The command for creating a thread has the following format:
_thread.start_new_thread( program, (param_list))
To create a thread, a subprogram must be prepared by defining the parameter list to match the call in the command. _thread.start_new_thread( ) and to exit the thread use the following commands:
_thread.exit( )
Reading thread ID uses the following format:
thread_id = _thread.get_ident()
Assigning the size of the memory stack to the thread and read the thread’s stack memory amount using the following command.
_thread.stack_size( size )
stack_size = _thread.stack_size()
Example of using _thread as demoThread1 program
# demoThread1
import _thread
# demoThread1
import _thread
import time
import random

runningTimes = [random.randint(3,8), random.randint(2,5)]

def myFunc(delay, id):
    global runningTimes
    while (runningTimes[id] > 0):
        time.sleep(delay)
        print('Running thread No.{} with delay = {}.'.format(id, delay))
        runningTimes[id] -= 1
    print("Thread No.{} ... end game!".format(id))
    _thread.exit()

if __name__=="__main__":
    for i in range(2):
        print("run thread No.{}, {} times.".format(i, runningTimes[i]))
        _thread.start_new_thread(myFunc, (random.randint(1, 4), i))
    print("End of main Program")
The demoThread1 example creates 2 threads to run in the background. When a thread is created, the main program finishes running but both threads continue to run. Each thread operates as a random delay. And when a thread completes a random number of runs, it exits the while loop, reports the thread’s termination, and calls _thread.exit() as in Figure 3.

An example of reading the main thread ID and that of a thread with the stack count of each thread is shown as demoThread2, and an example of the result of the operation is shown in Figure 4.
# demoThread2
import _thread

def myFunc(id, msg):
    print("ID : {}".format(_thread.get_ident()))
    print("Stack size : {}".format(_thread.stack_size()))
    print("Thread No.{} ... end game!\n".format(id))
    _thread.exit()

if __name__=="__main__":
    print("get_ident = {}".format(_thread.get_ident()))
    for i in range(2):
        print("run thread No.{}.".format(i))
        _thread.start_new_thread(myFunc, (i, "Ho"))
    print("End of main Program\n")

LockType
It is a class for creating a state, locking or unlocking resources that may be accessed by multiple processes at the same time.
lock_state = Lock.locked()
Lock.acquire()
Lock.release()
It can be seen that there are only 3 commands for status check, lock request, and lock removal respectively. An example program is as follows.
# demoThread3
import _thread

objLocked = _thread.allocate_lock()

def myFunc(id, msg):
    global objLocked
    while not objLocked.acquire():
        print("{}w/".format(id))
    if (objLocked.locked()):
        objLocked.release()
    print("Thread No.{} ... end game!\n".format(id))
    _thread.exit()

if __name__=="__main__":
    print("get_ident = {}".format(_thread.get_ident()))
    for i in range(2):
        print("run thread No.{}.".format(i))
        _thread.start_new_thread(myFunc, (i, "Ho"))
    print("End of main Program\n")
Conclusion
As the _thread class was not yet complete at the time of writing, and thonny doesn’t support background work, it caused an error while testing the program. And threading can be used to allow a wider variety of background programs to be executed in addition to using interrupts or scheduling. Finally, have fun with programming.
If you want to talk with us, feel free to leave comments below!!
References
(C) 2020-2021, By Jarut Busarathid and Danai Jedsadathitikul
Updated 2021-10-31