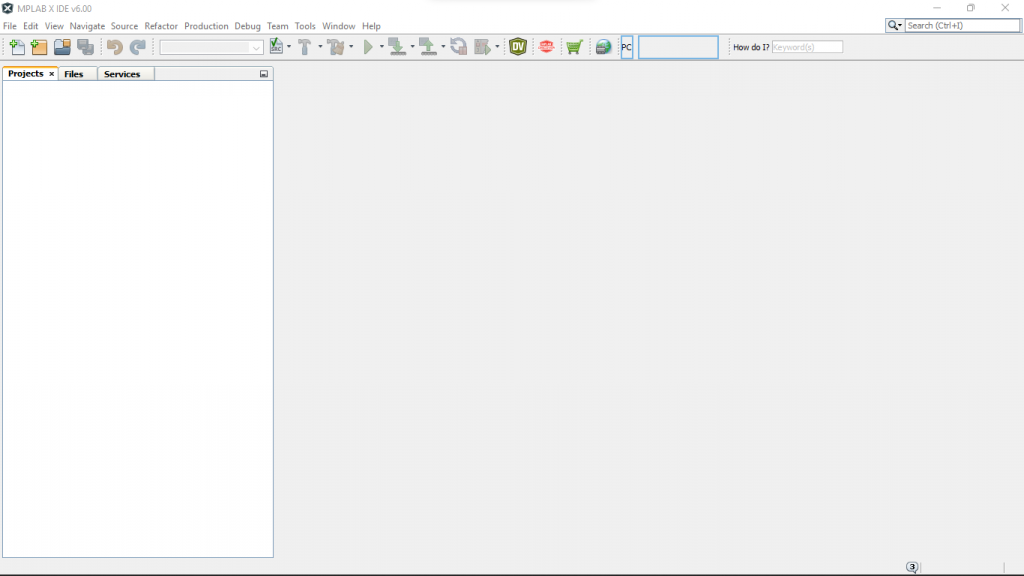
บทความนี้เป็นการใช้งานชุดพัฒนาโปรแกรม MPLAB X IDE (ดังภาพที่ 1) เพื่อใช้กับไมโครคอนโทรลเลอร์แบบ 8 บิตของบริษัท Microchip ด้วยภาษา C ผ่านทางเครื่องมือแปลภาษาที่เรียกว่า XC8 เพื่อเป็นพื้นฐานเบื้องต้นสำหรับการใช้งานในบทความต่อไป ซี่งขั้นตอนการพัฒนาโปรแกรมด้วยเครื่องมือชุดนี้มีขั้นตอนดังนี้
- สร้างไฟล์โครงงานและกำหนดประเภทของชิพไมโครคอนโทรลเลอร์เป็น PIC18F458
- สร้างไฟล์ภาษา C สำหรับชุดแปลภาษา XC8
- สร้างข้อมูลเกี่ยวกับการตั้งค่าไมโครคอนโทรลเลอร์เพื่อนำมาแปะเข้ากับโค้ดโปรแกรม
- คอมไพล์โปรแกรม
- นำไฟล์ที่ได้นั้นไปอัพโหลดเข้าบอร์ดผ่านทางเครื่องมือ PICKit2 หรือใหม่กว่า
สร้างโครงงาน
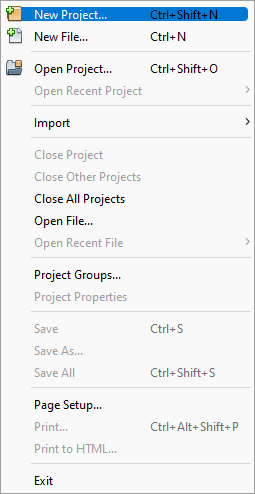
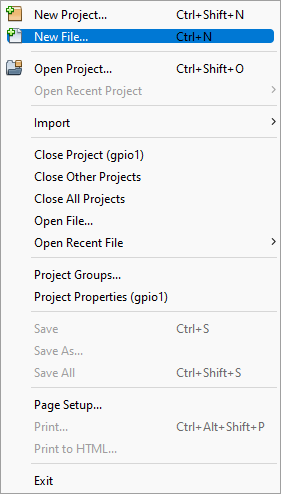
การสร้างโครงงานเป็นการสร้างกลุ่มของไดเร็กทอรีและไฟล์สำหรับจัดเก็บรายการไฟล์ที่เกี่ยวข้องกับโครงงานนั้นพร้อมทั้งสร้างไฟล์ Makefile สำหรับใช้ในการคอมไพล์โปรแกรม โดยชั้นตอนการสร้างเริ่มต้นจากการเข้าเมนู File เพื่อเลือกรายการเป็น New Project … ดังภาพที่ 2
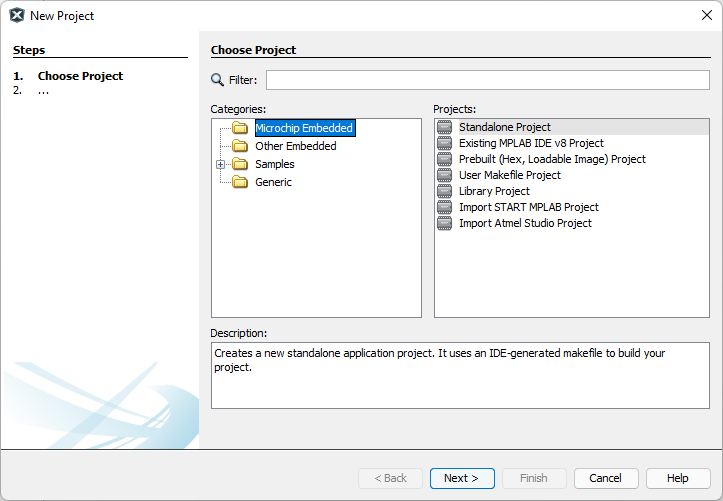
หลังจากนั้นจะแสดงหน้าต่างดังภาพที่ 3 ห้เลือกประเภทของโครงงาน โดยในที่นี้ให้เลือกประเภท (Categories) เป็น Microchip Embedded และประเภทของโครงงาน (Projects) เป็น Standalone Project หลังจากนั้นกด Next>
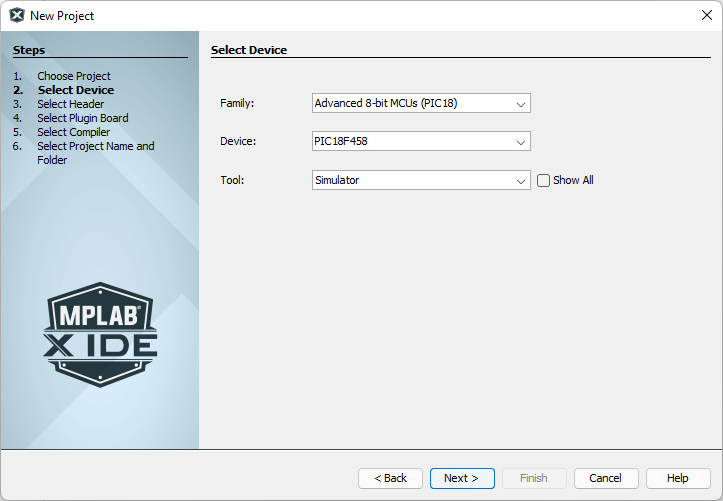
ขั้นตอนในภาพที่ 4 เป็นการเลือกประเภทของไมโครโครคอนโทรลเลอร์ที่ใช้งาน โดยกำหนด Family เป็น Advanced 8-bit MCUs (PIC18) กำหนด Device เป็น PIC18F458 และเลือก Tool เป็น None หรือ Simulator หลังจากนั้นคลิกที่ปุ่ม Next>
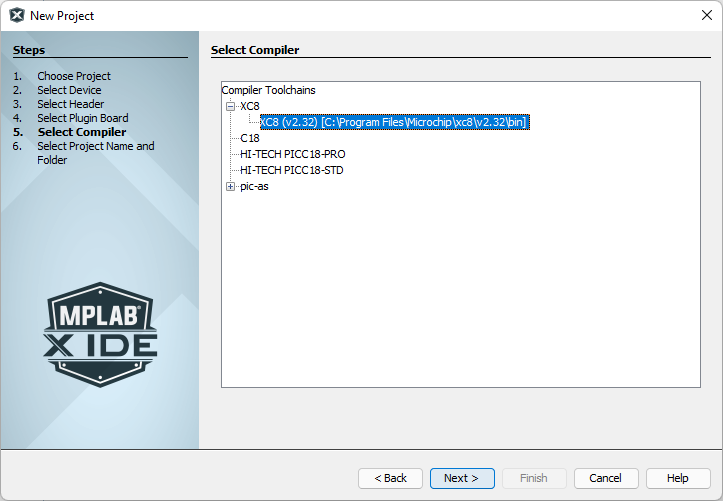
หลังจากกำหนดประเภทของโมโครคอนโทรลเลอร์ที่เลือกใช้จะเป็นการกำหนดประเภทของตัวแปลภาษาที่ใช้งาน โดยให้เลือกเป็น XC8 ดังภาพที่ 5 แล้วคลิกที่ปุ่ม Next> เพื่อเข้าสู่ขั้นตอนถัดไป
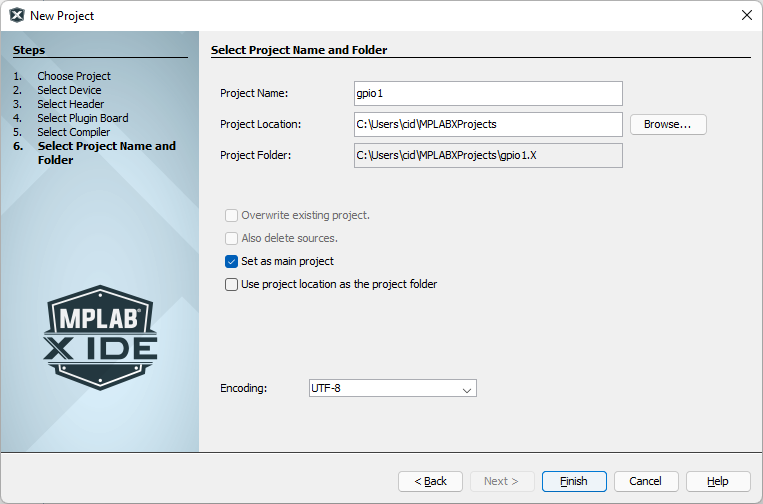
ขั้นตอนสุดท้ายของการสร้างโครงงานคือ กำหนดชื่อของโครงงาน (ในที่นี้กำหนดเป็น gpio1) ตำแหน่งที่เก็บโครงงาน และรายละเอียดเกี่ยวกับการตั้งให้โครงงานนี้เป็นโครงงานหลัก (กรณีที่มีหลายโครงงาน) เพื่อให้เป็นโครงงานที่ถูกเรียกแปลภาษาเมื่อสั้งคอมไพล์โปรแกรม และผู้เขียนเลือก Encoding เป็น UTF-8 เพื่อให้มองข้อมูลในไฟล์เป็นตัวอักษรที่เข้ารหัสแบบ UTF-8 ทำให้สามารถเขียนคำแนะนำที่เป็นภาษาไทยประกอบไว้ได้ และไม่มีปัญหาเมื่อนำไปเปิดในเครื่องที่เป็นภาษาอื่น ๆ ดังภาพที่ 6
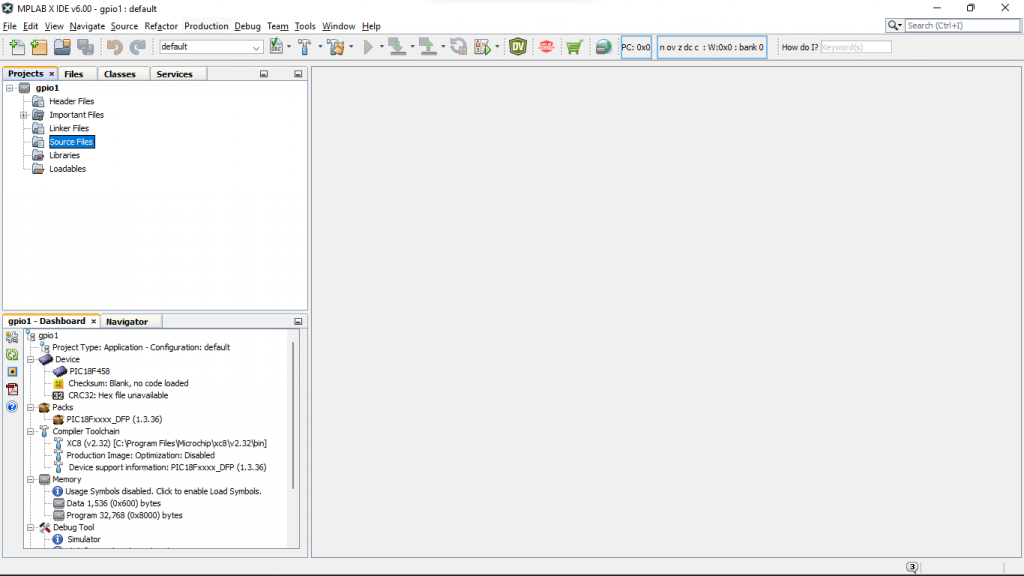
สุดท้ายคลิกที่ปุ่ม Finish และรอให้โปรแกรมทำการสร้างไดเร็กทอรีและไฟล์ที่เกี่ยวข้องให้ เมื่อพร้อมใช้งานจะเป็นดังภาพที่ 7
การเพิ่มไฟล์ภาษา C
สิ่งที่ MPLAB X IDE สร้างให้เราเป็นไฟล์ Makefile ที่เก็บไว้ในไดเร็กทอรี Important Files ซึ่งเป็นไฟล์ประเภทตัวอักษะที่เก็บรายละเอียดเกี่ยวกับการคอมไพล์โปรแกรมดังตัวอย่างต่อไปนี้
#
#  There exist several targets which are by default empty and which can be
#  used for execution of your targets. These targets are usually executed
#  before and after some main targets. They are:
#
#     .build-pre:              called before 'build' target
#     .build-post:             called after 'build' target
#     .clean-pre:              called before 'clean' target
#     .clean-post:             called after 'clean' target
#     .clobber-pre:            called before 'clobber' target
#     .clobber-post:           called after 'clobber' target
#     .all-pre:                called before 'all' target
#     .all-post:               called after 'all' target
#     .help-pre:               called before 'help' target
#     .help-post:              called after 'help' target
#
#  Targets beginning with '.' are not intended to be called on their own.
#
#  Main targets can be executed directly, and they are:
#
#     build                    build a specific configuration
#     clean                    remove built files from a configuration
#     clobber                  remove all built files
#     all                      build all configurations
#     help                     print help mesage
#
#  Targets .build-impl, .clean-impl, .clobber-impl, .all-impl, and
#  .help-impl are implemented in nbproject/makefile-impl.mk.
#
#  Available make variables:
#
#     CND_BASEDIR                base directory for relative paths
#     CND_DISTDIR                default top distribution directory (build artifacts)
#     CND_BUILDDIR               default top build directory (object files, ...)
#     CONF                       name of current configuration
#     CND_ARTIFACT_DIR_${CONF}   directory of build artifact (current configuration)
#     CND_ARTIFACT_NAME_${CONF}  name of build artifact (current configuration)
#     CND_ARTIFACT_PATH_${CONF}  path to build artifact (current configuration)
#     CND_PACKAGE_DIR_${CONF}    directory of package (current configuration)
#     CND_PACKAGE_NAME_${CONF}   name of package (current configuration)
#     CND_PACKAGE_PATH_${CONF}   path to package (current configuration)
#
# NOCDDL


# Environment
MKDIR=mkdir
CP=cp
CCADMIN=CCadmin
RANLIB=ranlib


# build
build: .build-post

.build-pre:
# Add your pre 'build' code here...

.build-post: .build-impl
# Add your post 'build' code here...


# clean
clean: .clean-post

.clean-pre:
# Add your pre 'clean' code here...
# WARNING: the IDE does not call this target since it takes a long time to
# simply run make. Instead, the IDE removes the configuration directories
# under build and dist directly without calling make.
# This target is left here so people can do a clean when running a clean
# outside the IDE.

.clean-post: .clean-impl
# Add your post 'clean' code here...


# clobber
clobber: .clobber-post

.clobber-pre:
# Add your pre 'clobber' code here...

.clobber-post: .clobber-impl
# Add your post 'clobber' code here...


# all
all: .all-post

.all-pre:
# Add your pre 'all' code here...

.all-post: .all-impl
# Add your post 'all' code here...


# help
help: .help-post

.help-pre:
# Add your pre 'help' code here...

.help-post: .help-impl
# Add your post 'help' code here...


# include project implementation makefile
include nbproject/Makefile-impl.mk

# include project make variables
include nbproject/Makefile-variables.mk
สิ่งที่ต้องทำคือสร้างไฟล์เขียนโปรแกรม (ในที่นี้เลือกเป็นภาษา C) ให้ไปที่เมนู File และเลือก New File… ดังภาพที่ 7
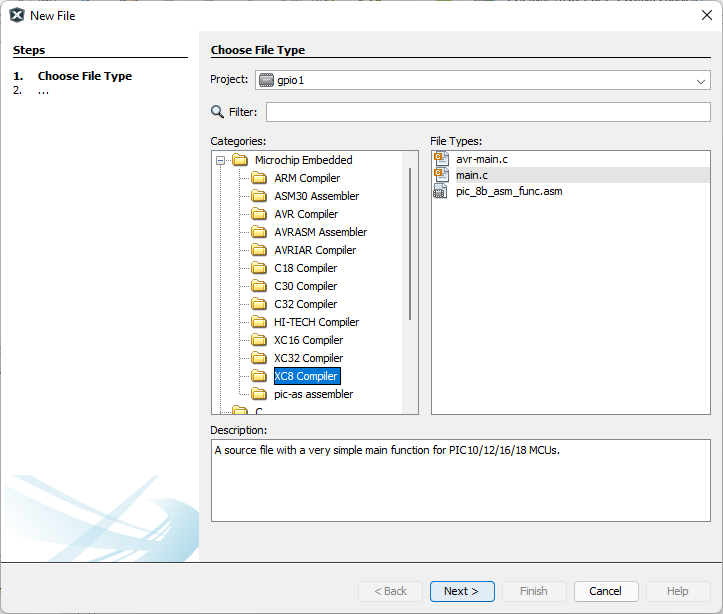
หลังจากเลือกรายการ New File… จะแสดงหน้าต่างดังภาพที่ 8 เพื่อให้ผู้ใช้งานเลือกประเภทของไฟล์ โดยในที่นี้ให้เลือกเป็นตัวเลือก XC8 Compiler ใน Microchip Embedded และประเภทของไฟล์เป็น main.c
หลังจากที่คลิกปุ่ม Next> ของภาพที่ 8จะเข้าสู่ขั้นตอนการกำหนดชื่อไฟลฺดังภาพที่ 9 โดยผู้เขียนได้ตั้งชื่อไฟล์เป็น main.c หลังจากนั้นคลิกที่ปุ่ม Finish เพื่อสิ้นสุดการสร้างไฟล์

หลังจากสร้างไฟล์เสร็จ ระบบจะสร้างไฟล์ main.c เก็บไว้ในส่วนของ Source Files ดังภาพที่ 10 โดยโครงสร้างของโปรแรกมที่ถูกสร้างขึ้นมานั้นเป็นดังนี้
/*
 * File:   main.c
 * Author: cid
 *
 * Created on February 10, 2022, 10:22 AM
 */


#include <xc.h>

void main(void) {
    return;
}
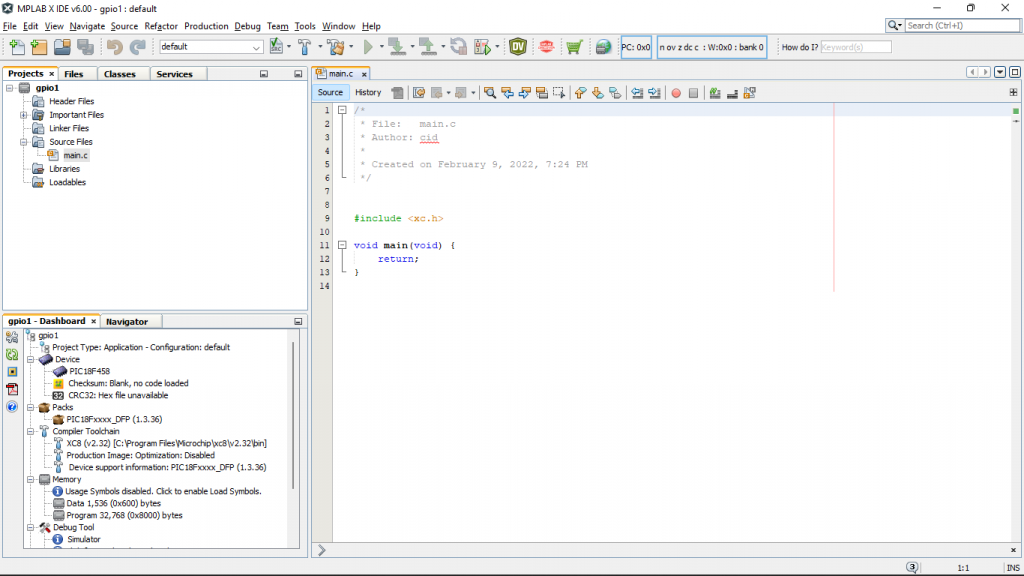
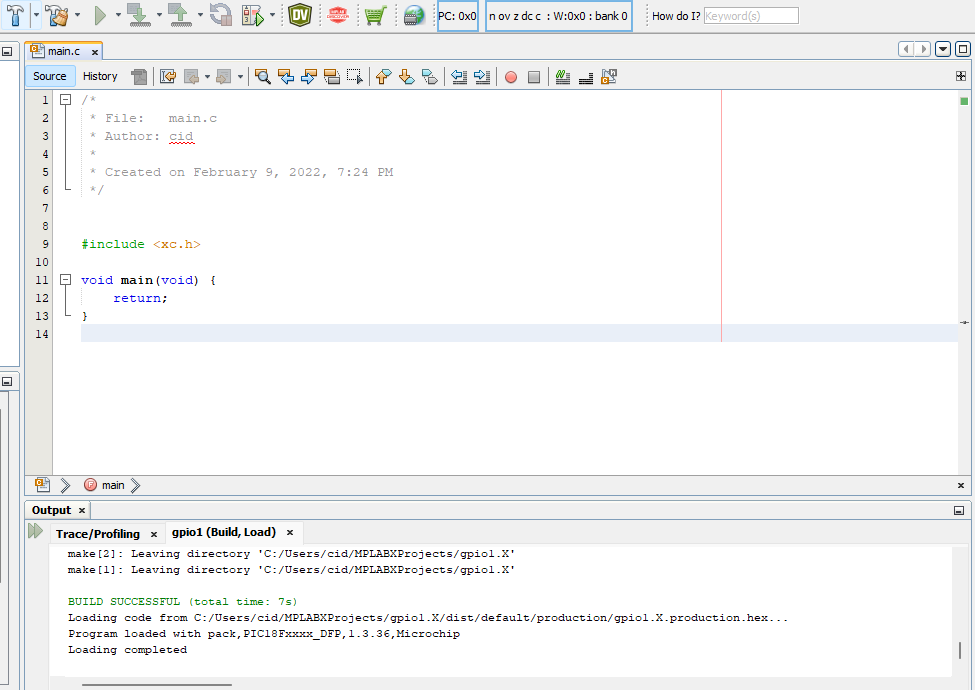
เพื่อทดสอบว่าระบบติดตั้งและใช้งานได้ให้คลิกที่ไอคอนรูปค้อนดังภาพที่ 11 เพื่อทำการทดสอบคอมไพล์โปรแกรม หลังจากนั้นดูผลการทำงานที่หน้าต่าง Output ว่ามีข้อผิดพลาดหรือไม่ ถ้าการติดตั้ง XC8 เป็นปกติเรียบร้อยจะรายงานผลดังภาพที่ 11
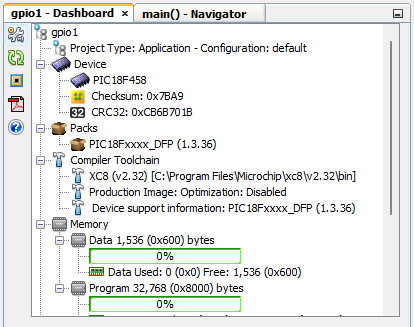
ในภาพที่ 12 เป้นส่วนของหน้าต่าง Dashboard ใช้ดูรายละเอียดเกี่ยวกับโครงงานว่าเป็นอุปกรณ์ไมโครคอนโทรลเลอร์ประเภทใด ใช้เครื่องมืออะไรในการคอมไพล์โปรแกรม รายละเอียดเกี่ยวกับการใช้หน่วยความจำ และอื่น ๆ
ตั้งค่าคอนฟิก
เนื่องจาก PIC18F458 เป็นไมโครคอนโทรลเลอร์ประเภทหนึ่ง ซึ่งมีหน่วยทำงานหลายประเภทอยู่ในตัว ทำให้ผู้เขียนโปรแกรมจะต้องกำหนดค่าเริ่มต้นของหน่วยต่าง ๆ ที่ใช้งาน (รายละเอียดได้กล่าวถึงในบทความก่อนหน้านี้) และข้อดีของ MPLAB X IDE คือ มีเครื่องมือสำหรับช่วยเหลือในการแสดงรายการคอนฟิกให้ผู้เขียนโปรแกรมนำมาใช้เป็นต้นแบบได้โดยการเข้าไปที่เมนู Window ดังภาพที่ 13

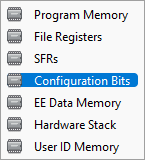
ในรายการย่อย Target Memory Views ของเมนู Window จะมีรายการให้เลือกดังภาพที่ 14 โดยในที่นี้ให้เลือก Configuration Bits
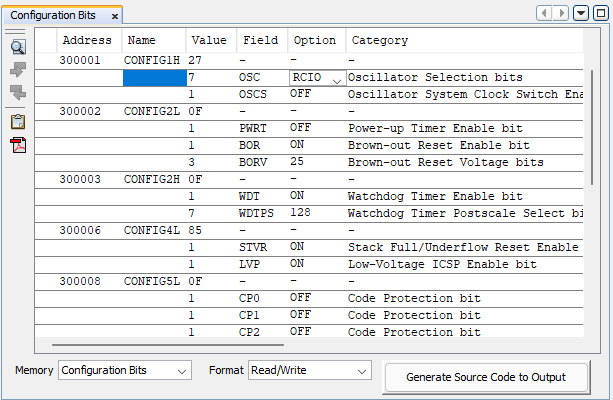
หลังจากเลือกรายการ Configuration Bits จะปรากฏหน้าต่าง Configuration Bits ดังภาพที่ 15 ที่รายงานตำแหน่งหน่วยความจำ ชื่อของคอนฟิก ค่าที่กำหนด พร้อมคำอธิบายให้เราตั้งค่าได้ เมื่อตั้งค่าเป็นที่เรียบร้อยให้คลิกที่ปุ่ม Generate Source Code to Output
หลังจากที่คลิกปุ่ม Generate Source Code to Output จะพบว่าที่ส่วนของ Output มีแท็บชื่อ Config Bits Source ดังภาพที่ 16
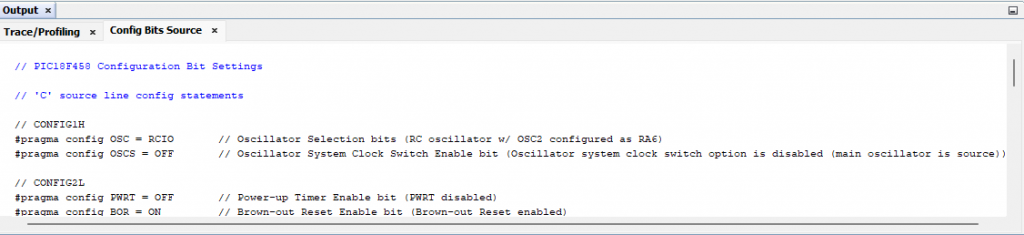
จากโค๊ดที่ระบบสร้างให้ดังภาพที่ 16 ให้คัดลอกไปใส่ในไฟล์ main.c จึงได้ผลลัพธ์ของไฟล์เป็นดังนี้
// PIC18F458 Configuration Bit Settings
// 'C' source line config statements
// CONFIG1H
#pragma config OSC = RCIO       // Oscillator Selection bits (RC oscillator w/ OSC2 configured as RA6)
#pragma config OSCS = OFF       // Oscillator System Clock Switch Enable bit (Oscillator system clock switch option is disabled (main oscillator is source))

// CONFIG2L
#pragma config PWRT = OFF       // Power-up Timer Enable bit (PWRT disabled)
#pragma config BOR = ON         // Brown-out Reset Enable bit (Brown-out Reset enabled)
#pragma config BORV = 25        // Brown-out Reset Voltage bits (VBOR set to 2.5V)

// CONFIG2H
#pragma config WDT = ON         // Watchdog Timer Enable bit (WDT enabled)
#pragma config WDTPS = 128      // Watchdog Timer Postscale Select bits (1:128)

// CONFIG4L
#pragma config STVR = ON        // Stack Full/Underflow Reset Enable bit (Stack Full/Underflow will cause Reset)
#pragma config LVP = ON         // Low-Voltage ICSP Enable bit (Low-Voltage ICSP enabled)

// CONFIG5L
#pragma config CP0 = OFF        // Code Protection bit (Block 0 (000200-001FFFh) not code protected)
#pragma config CP1 = OFF        // Code Protection bit (Block 1 (002000-003FFFh) not code protected)
#pragma config CP2 = OFF        // Code Protection bit (Block 2 (004000-005FFFh) not code protected)
#pragma config CP3 = OFF        // Code Protection bit (Block 3 (006000-007FFFh) not code protected)

// CONFIG5H
#pragma config CPB = OFF        // Boot Block Code Protection bit (Boot Block (000000-0001FFh) not code protected)
#pragma config CPD = OFF        // Data EEPROM Code Protection bit (Data EEPROM not code protected)

// CONFIG6L
#pragma config WRT0 = OFF       // Write Protection bit (Block 0 (000200-001FFFh) not write protected)
#pragma config WRT1 = OFF       // Write Protection bit (Block 1 (002000-003FFFh) not write protected)
#pragma config WRT2 = OFF       // Write Protection bit (Block 2 (004000-005FFFh) not write protected)
#pragma config WRT3 = OFF       // Write Protection bit (Block 3 (006000-007FFFh) not write protected)

// CONFIG6H
#pragma config WRTC = OFF       // Configuration Register Write Protection bit (Configuration registers (300000-3000FFh) not write protected)
#pragma config WRTB = OFF       // Boot Block Write Protection bit (Boot Block (000000-0001FFh) not write protected)
#pragma config WRTD = OFF       // Data EEPROM Write Protection bit (Data EEPROM not write protected)

// CONFIG7L
#pragma config EBTR0 = OFF      // Table Read Protection bit (Block 0 (000200-001FFFh) not protected from Table Reads executed in other blocks)
#pragma config EBTR1 = OFF      // Table Read Protection bit (Block 1 (002000-003FFFh) not protected from Table Reads executed in other blocks)
#pragma config EBTR2 = OFF      // Table Read Protection bit (Block 2 (004000-005FFFh) not protected from Table Reads executed in other blocks)
#pragma config EBTR3 = OFF      // Table Read Protection bit (Block 3 (006000-007FFFh) not protected from Table Reads executed in other blocks)

// CONFIG7H
#pragma config EBTRB = OFF      // Boot Block Table Read Protection bit (Boot Block (000000-0001FFh) not protected from Table Reads executed in other blocks)

// #pragma config statements should precede project file includes.
// Use project enums instead of #define for ON and OFF.

#include <xc.h>

void main(void) {
    return;
}
คอมไพล์ และอัพโหลด
การคอมไพล์โปรแกรมทำได้ด้วยการคลิกที่ไอคอนรูปค้อนเพื่อทำการแปลโปรแกรมซึ่งจะได้ผลลัพธ์ในหน้าต่าง Output ดังต่อไปนี้
make -f nbproject/Makefile-default.mk SUBPROJECTS= .build-conf
make[1]: Entering directory '/home/cid/MPLABXProjects/gpio1.X'
make  -f nbproject/Makefile-default.mk dist/default/production/gpio1.X.production.hex
make[2]: Entering directory '/home/cid/MPLABXProjects/gpio1.X'
"/opt/microchip/xc8/v2.36/bin/xc8-cc"  -mcpu=18F458 -c   -mdfp="/opt/microchip/mplabx/v6.00/packs/Microchip/PIC18Fxxxx_DFP/1.3.36/xc8"  -fno-short-double -fno-short-float -memi=wordwrite -O0 -fasmfile -maddrqual=ignore -xassembler-with-cpp -mwarn=-3 -Wa,-a -DXPRJ_default=default  -msummary=-psect,-class,+mem,-hex,-file  -ginhx32 -Wl,--data-init -mno-keep-startup -mno-download -mdefault-config-bits   -std=c99 -gdwarf-3 -mstack=compiled:auto:auto:auto     -o build/default/production/main.p1 main.c
"/opt/microchip/xc8/v2.36/bin/xc8-cc"  -mcpu=18F458 -Wl,-Map=dist/default/production/gpio1.X.production.map  -DXPRJ_default=default  -Wl,--defsym=__MPLAB_BUILD=1   -mdfp="/opt/microchip/mplabx/v6.00/packs/Microchip/PIC18Fxxxx_DFP/1.3.36/xc8"  -fno-short-double -fno-short-float -memi=wordwrite -O0 -fasmfile -maddrqual=ignore -xassembler-with-cpp -mwarn=-3 -Wa,-a -msummary=-psect,-class,+mem,-hex,-file  -ginhx32 -Wl,--data-init -mno-keep-startup -mno-download -mdefault-config-bits -std=c99 -gdwarf-3 -mstack=compiled:auto:auto:auto      -Wl,--memorysummary,dist/default/production/memoryfile.xml -o dist/default/production/gpio1.X.production.elf  build/default/production/main.p1

Memory Summary:
    Program space        used    16h (    22) of  8000h bytes   (  0.1%)
    Data space           used     0h (     0) of   600h bytes   (  0.0%)
    Configuration bits   used     7h (     7) of     7h words   (100.0%)
    EEPROM space         used     0h (     0) of   100h bytes   (  0.0%)
    ID Location space    used     8h (     8) of     8h bytes   (100.0%)

make[2]: Leaving directory '/home/cid/MPLABXProjects/gpio1.X'
make[1]: Leaving directory '/home/cid/MPLABXProjects/gpio1.X'

BUILD SUCCESSFUL (total time: 4s)
Loading code from /home/cid/MPLABXProjects/gpio1.X/dist/default/production/gpio1.X.production.hex...
Program loaded with pack,PIC18Fxxxx_DFP,1.3.36,Microchip
Loading completed
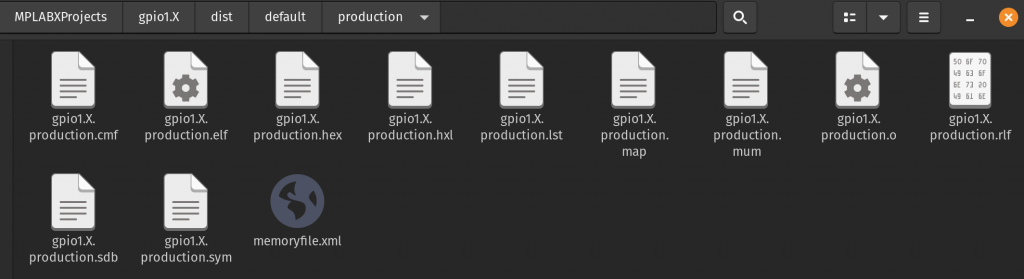
และเมื่อเข้าไปดูในไดเร็กทอรีที่เก็บโครงงานจะมีไดเร็กทอรีชื่อ dist/default/production สำหรับเก็บไฟล์ที่คอมไพล์และนำไปโปรแกรมลงชิพดังภาพที่ 17
สรุป
จากบทความนี้ ผู้อ่านจะสามารถสร้างไฟล์โครงงานและไฟล์ต้นฉบับภาษา C พร้อมทั้งการตั้งค่าการทำงานไมโครคอนโทรลเลอร์ได้ หลังจากนี้ไปจะเป็นการทำความรู้จักกับเรจิสเตอร์ที่เกี่ยวข้องกับการใช้ GPIO เพื่อสั่งงานแสดงผล หรืออ่านค่าในบทความถัด ๆ ไป อันได้แก่ LED, Switch, 7-Segment, ADC, PWM, RTC และ LCD ซึ่งเป็นไปตามแล็บของรายวิชาสถาปัตยกรรมคอมพิวเตอร์ สุดท้าย ขอให้สนุกกับการเขียนโปรแกรมครับ
(C) 2022, โดย อ.อนุชาติ บุญมาก, อ.ดนัย เจษฎาฐิติกุล/อ.จารุต บุศราทิจ
ปรับปรุงเมื่อ 2022-02-10, 2022-03-07