[EN] machine.RTC

This article takes a detailed look at the Micropython machine.RTC class. The main function of this class is designed to be an RTC (Real-Time Clock) inside the microcontroller for storing date and time. It is more convenient when used with ESP8266 or ESP32 chip because NTP can be accessed to read the date and time from the internet and then store the value into the RTC to enable the accuracy and do not require frequent internet access to read the values ​​again. This saves the use of external RTC circuits as well.

[TH] LEDs on/off via PyQt5 and serial communication.

ในบทความนี้ใช้ความรู้จากบทความการอ่านรายชื่อพอร์ตอนุกรมที่ถูกเชื่อมต่อมาปรับปรุงให้เป็นการส่งข้อมูลส่งไปให้บอร์ด Arduino Uno ที่มีหลอดแอลอีดี (LED) เชื่อมต่ออยู่ที่ขา 2,3,4,5,6,7,8 และ 9 ทำให้ผู้ใช้งานสามารถสั่งเปิดหรือปิดหลอดดังกล่าวด้วยการสั่งงานผ่าน GUI (Graphics User Interface) ของ PyQt5 ดังภาพที่ 1 และส่งข้อมูลไปให้บอร์ด Uno ทางพอร์ตสื่อสารอนุกรมด้วย pySerial โดยในตัวอย่างครั้งนี้ การทำงานรองรับทั้งระบบปฏิบัติการ Windows, macOS และ Linux ซึ่งจะทำให้เห็นว่า PyQt5 และ pySerial สามารถรองรการทำงานกับทั้ง 3 ระบบได้

[TH] List the serial ports connected to the RPi with pySerial and PyQt5.

จากบทความก่อหน้านี้เราได้อ่านรายชื่ออุปกรณ์ที่เชื่อมต่อกับพอร์ตอนุกรมของบอร์ด Raspberry Pi หรือ RPi ด้วยไลบรารี pySerial ดังภาพที่ 1 ในแบบโหมดตัวอักษรไปแล้ว ในบทความนี้เป็นการผนวกหลักการทำงานจากก่อนหน้าเข้ากับการใช้ส่วนติดต่อกับผู้ใช้แบบกราฟิกส์ หรือ GUI (Graphics User Interface) ผ่านทางไลบรารี PyQt5 โดยแสดงรายการเอาไว้ใน combobox เพื่อให้ผู้ใช้งานเลือกใช้งานได้ แต่ถ้าไม่พบพอร์ตสื่อสารอนุกรมที่เชื่อมต่อกับบอร์ด RPi จะปิดการใช้งานของ combobox ไม่ให้ผู้ใช้งานเลือกใช้งาน ดังนั้น บทความนี้จึงมีเนื้อหาเกี่ยวกับการประยุกต์ใช้ pySerial กับการใช้งานของ QLabel และ QComboBox ในไลบรารี PyQt5

[EN] Bare Metal Cortex-M Ep.2

From the previous article, we have tried writing a program to study the elements of various files that we need, we found that there are quite a lot of details and steps. But it is an important basis for those who want to seriously and usefully study Cortex-M0 programming via STM32F030F4P6 (Figure 1), Cortex-M3 with STM32F103C (Figure 32) and Cortex-M4 with STM32F401CCU6 (Figure 27) to study of programming structure with programming tool STM32CubeIDE (Figure 2), which is the main tool used in this series of articles. This is because it combines ST’s complete development kit for ARM, including CubeMX for chip design, compiler toolkit, ST-Link program debugging tool and code editor in one tool,  plus it supports both Windows, Linux and macOS operating systems.

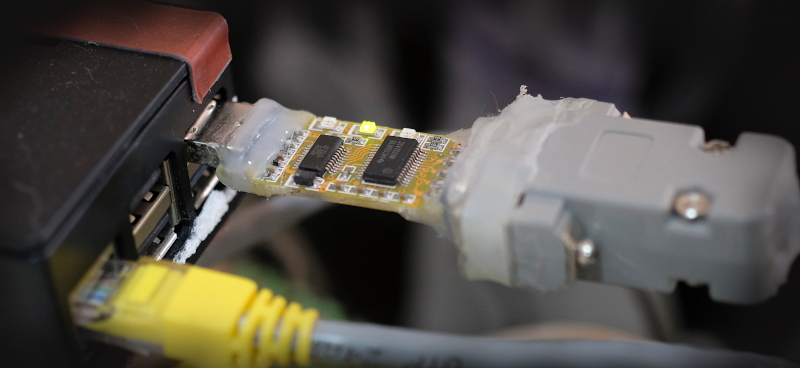
(Figure. 1 STM32F030F4P6 and USB–RS232 )

[TH] List the serial ports connected to the RPi with pySerial.

บทความนี้กล่าวถึงการใช้ไลบรารี pySerial ของภาษาไพธอนบนบอร์ด Raspberry Pi หรือ RPi ทั้งรุ่น 3 และ 4 เพื่อเชื่อมต่อกับพอร์ตสื่อสารอนุกรม (Serial Port) ซึ่งตัวบอร์ดสามารถทำได้ 2 ลักษณะคือ ใช้ฮาร์ดแวร์อย่าง ET-CONV10/RS232 HAT ที่ได้เขียนถึงในหนังสือ กับการใช้พอร์ต USB เชื่อมต่อกับตัวแปลงเป็นพอร์ตสื่อสารอนุกรม (USB to Serial Port) ดังภาพที่ 1 โดยบทความนี้เป็นการใช้แบบที่ 2 เพื่อเรียกใช้ pySerial สำหรับตรวจสอบว่ามีพอร์ตอนุกรมเชื่อมต่ออยู่กี่พอร์ตและชื่ออะไรบ้าง ดังตัวอย่างในภาพที่ 8

ภาพที่ 1 การเชื่อมต่อ ET-USB/RS232 Mini เข้ากับพอร์ต USB ของ RPi

[TH] Calculate Regression with MicroPython on esp32-C3.

บทความนี้กล่าวถึงการคำนวณค่าถดถอย (Regression) ด้วยภาษาไพธอนของ MicroPython โดยใช้บอร์ดไมโครคอนโทรลเลอร์ ESP32-C3 พร้อมทั้งแสดงผลด้วยจอแสดงผลกราฟิกแบบ 2 สี (แสดงกับไม่แสดงเม็ดสี) แบบ OLED ดังภาพที่ 1 ซึ่งค่าที่นำมาใช้เป็นตัวอย่างในการใช้งานเป็นค่าที่ได้จากการอ่านอุณหภูมิ

ภาพที่ 1 บอร์ด ESP32-C3 ที่ต่อเติมโมดูล OLED และขาสำหรับเชื่อมต่อภายนอก

[TH] How to build MicroPython for esp32-C3.

บทความนี้กล่าวถึงการคอมไพล์ (build) และใช้งาน MicroPython สำหรับไมโครคอนโทรลเลอร์ esp32-C3 ที่ได้เคยแนะนำไปแล้ว โดยขั้นตอนยังเหมือนกับการคอมไพล์สำหรับ esp32-s2 นอกจากนี้ทีมงานได้ดำเนินการแก้ไขปัญหาเรื่องของ RS232-to-USB จากที่บอร์ดใช้ CH340 ไปต่อขาภายนอกโดยใช้ CP2102 แทน และต่อโมดูลแสดงผลด้วย OLED ดังภาพที่ 1

ภาพที่ 1 บอร์ด ESP32-C3 ที่ต่อเติมโมดูล OLED และขาสำหรับเชื่อมต่อภายนอก

[EN] machine.SPI

From the article machine.Pin, it has been discussed using a microcontroller pin to import and export data and in the article I2C bus communication which uses the machine.I2C class to communicate between devices. Now let’s take a look at the machine.SPI class, another form of communication that has been recognized for its speed and is commonly used with a graphics display (esp8266/esp32 article) or SD-Card reader (esp8266, esp32article).

[EN] ESP32 machine.Timer

This article discusses the use of 4 timers of the ESP32 to be used to run the program when it meets the specified time. Difference Between Using Timer and Delay time.sleep()/time.sleep_ms()/time.sleep_us() is that time delay is a loop to allow the processor to spend time looping to complete the specified amount of time whereas the timer uses the principle of having a function run every time a specified time is reached, so while a timer does not call a function to execute the processor has idle time for other processing, and unlike interrupts, it is a timer interrupt instead of a pin state interrupt connected to an external circuit.